Basic Guide On How To Create And Edit Videos Using Canva

Basic Guide On How To Create And Edit Videos Using Canva


Canva has become a popular design application because it can be used to create, design and edit photos and videos.

It is suitable for all types of devices and operating systems such as Windows, iOS and Android. Canva is completely cloud-based, no need to install anything to use it, just sign up for a free account. Once that’s done, log in from any computer or even use the Canva mobile app.

Canva
Canva Home Page


Even so, Canva has provided the facility to install the Canva application on a computer or laptop, just go to the Canva website, choose the computer's operating system and download it.

Canva application
Download Canva


Canva provides options for creating video content for TikTok, Youtube, Linkedin, Pintrest, Facebook and Instagram by automatically following the video dimensions of each application.

Here is a basic guide on how to create and editing videos using Canva.

Go to the Canva home page and log in, or open the Canva application, displayed of many options for starting video project. (See Picture 1)

many options for starting video project
Picture 1


Click on ‘Video’ (Create blank) or ‘YouTube Video’. (See Picture 2)

YouTube Video
Picture 2


The following display appears, on the left side menu providing a variety of templates and collections to facilitate users in making quality videos. (See Picture 3)

a variety of
templates and collections
Picture 3


Select and click any free video template without the crown label from the left side menu, to be displayed on the canvas. (See Picture 4)

free video template
Picture 4


Editing video process begin here, start editing with click on any image, text, colour or any element on canvas to crop, flip, animate, to rotate, to copy, to move or to delete as in option menu above canvas.

Click on image to edit. (See Picture 5)

image to edit
Picture 5


Click on text to edit. (See Picture 6)

text to edit
Picture 6


Click on shape element to edit it. (See Picture 7)

shape element to edit
Picture 7


To add page, click on ‘+’ sign. (See Picture 8)

To add page
Picture 8


To split page, right click on the page and select ‘Split page’ on pop-up box. (See Picture 9)

To split page
Picture 9


To add transition, click on ‘+’ sign between the page. (See Picture 10)

To add transition
Picture 10


To add more text, more elements, can choose from left side menu as shown in picture. (See Picture 11)

To add more
Picture 11


To edit audio, click on 3 dots and select the action. (See Picture 12)

To edit audio
Picture 12


To add another photo or to add and edit own video or add audio, go to ‘Uploads’, select either ‘Images’, ‘Videos’ or ‘Audio’ and click on ‘Uploads files’. Then select the file to upload. (See Picture 13)

Note: Recommanded to resize image before uploading into Canva application.

the file to upload
Picture 13


After all editing processes completed, preview the video before downloading it. Click on play button. (See Picture 14)

editing processes
Picture 14


Final, downloading the created video but it a bit tricky because have no downloading button available. To download the video click on ‘Share’ then click on ‘Download’, make sure downloading it in mp4 format and click on ‘Download’ again. (See Picture 15)

downloading it in mp4 format
Picture 15


Canva is not like other video maker tools because there is no need to worry about the watermark that is added when downloading a video in addition to being able to download the created videos without a limit.


How To:  Add Contact Us On Blogspot   Use FileZilla   Use IrfanView


Resize Image Using IrfanView

irfanview

IrfanView is a FREEWARE (for non-commercial use) graphic viewer for Windows XP, Vista, 7, 8, 10 and 11.

One of the facilities available on IrfanView is to change the size of the image file in Bytes, heavy images become lighter and easier to upload on the internet to share or load faster on websites. For example, an image with a size of 2.5 Mb is reduced to 200 kb without making any changes to the width and height of the image.

Through experience, IrfanView cannot resize images that are less than 1 MegaByte in size although there is no such statement from IrfanView's official website.

IrfanView can be downloaded from the official IrfanView website, available with option for Windows 32-Bit and 64-Bit.

download
Picture 1


To start resizing the image, open IrfanView, it should look like in picture 2.

open
Picture 2


1. Click on 'File' and then Click on 'Batch Conversion/Rename'

file
Picture 3


2. A 'Batch Conversion' popup box appears, ignore the columns set by default, no need to change anything except want to change image width and height in 'Advance' options.

default
Picture 4


3. Select image folder. Just follow as shown in the picture 5.

folder
Picture 5


4. Select images file from dropdown menu.

images
Picture 6


5. Click on ‘Add’

add
Picture 7


6. Select the output destination folder. The folder that will store the resized image files. Follow the steps as shown in the picture 8

destination
Picture 8


7. Click ‘Start Batch’ to resize image.

batch
Picture 9


8. Image resize done.. In the ‘Batch conversion done’ pop-up box a message is displayed in highlighted blue as shown in the picture 10:
  1 files – Error: 0 Warning: 0  
Successfully resized the image file..

Learn how to edit video.

batched
Picture 10


The resized image is in the destination folder selected in step 6.


How To: Add Contact Us On Blogspot    Use FileZilla    Use Canva


Beginners Guide How To Use Filezilla FTP Client

Beginners Guide How To Use Filezilla FTP Client

FileZilla FTP Client is a tool used to upload web files from a computer to a web server, download web files from a web server and delete web files on a web server.

Before continuing on the topic of how to use filezilla for beginners, this guide is specifically for Windows OS and the web server 000webhosting. Must be registered with 000webhost and have a domain.

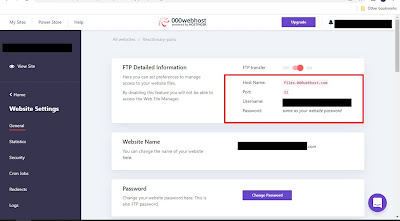
Log in first at 000webhost to get FTP detail Information needed when using FileZilla FTP Client. Save the information found in the red box as in the picture.

Beginners Guide How To Use Filezilla FTP Client
Picture 1


FileZilla FTP Client can be downloaded from the official FileZilla website.

Beginners Guide How To Use Filezilla FTP Client
Picture 2


Just click download as in the picture

Beginners Guide How To Use Filezilla FTP Client
Picture 3


After downloading the FileZilla FTP Client .exe file, run the .exe file to installed on the computer. Open FileZilla Ftp Client and see the result as in the picture.

Beginners Guide How To Use Filezilla FTP Client
Picture 4


Filezilla FTP Client usage guide for beginners starts from here with some steps to follow with picture guide.

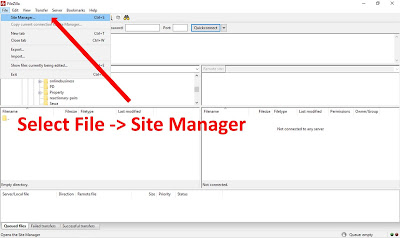
1. In the upper left corner please click 'File' and click 'File Manager' as in the picture 5. File Manager will save all information and not need to repeat fill in.

Beginners Guide How To Use Filezilla FTP Client
Picture 5


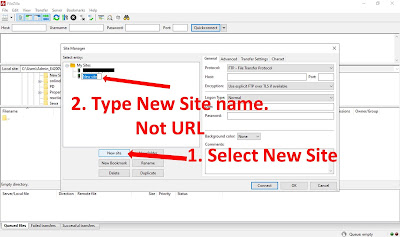
2. After clicking 'File Manager,' a pop-up box appears, click 'New Site' then type the name of the site, not the URL.

Beginners Guide How To Use Filezilla FTP Client
Picture 6


3. Still with the File Manager pop-up box, continue by filling in the necessary FTP detail Information obtained from the webhost earlier as in picture 1.

Beginners Guide How To Use Filezilla FTP Client
Picture 7


4. After clicking 'Connect' in the File Manager pop-up box, wait 1 or 2 seconds (depending on internet speed) until 'Directory listing of "/" successful' is displayed as shown, and continue to the next step

Beginners Guide How To Use Filezilla FTP Client
Picture 8


5. Click on the folder where the web file is stored that will be uploaded to the web server, then click on the empty space like no. 2 in the picture 9, this will be highlighted and press enter, and then click on 'public-html'. See picture 9.

Important: All web files will be uploaded to 'public-html' folder and don't forget to click 'public-html' before uploading any file to the web server. It is the root folder, otherwise, the website will not be up and running.

Beginners Guide How To Use Filezilla FTP Client
Picture 9


6. After clicking 'public-html' again wait 1 or 2 seconds until 'Directory listing of "/public-html" successful' is displayed

Beginners Guide How To Use Filezilla FTP Client
Picture 10


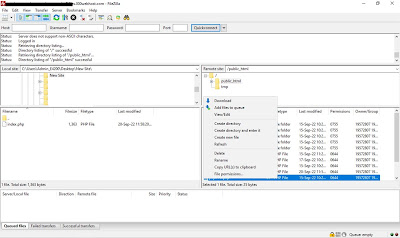
7. Now it's time to upload the web file to the web server, right-click the web file and click 'Upload' on the pop-up box that appears, wait until 'Directory listing of "/public-html" successful' is displayed to make sure the web file successful uploaded.

Note: For image file upload, resize the image file before uploading to the web server, it will load faster on the website.

Beginners Guide How To Use Filezilla FTP Client
Picture 11


Download And Delete File On Web Server

Repeat steps 1-7 above and select any file for action. Right click on the web file, from pop-up box select either to download or delete web file from web server..

Beginners Guide How To Use Filezilla FTP Client
Picture 12


Managing more than one website domain, even with different web hosting, only 1 FileZilla FTP Client is used, just repeat the process in step 2 and 3 above, add new site in file manager and fill in FTP detail Information.


How To: Add Contact Us On Blogspot    Use IrfanView    Use Canva


Add Contact Us Page On Blogger Blog - External Webhosting

Add Contact Us Page On Blogger Blog


Blog bloggers who use the Blogger blogspot platform may have an experience cannot upload files such as .php files, have no facilities to do that, only using cms templates but not allowed to uploading such files.

This might be a problem for some blogspot bloggers who want to upload files for specific purposes such as to creating a static Contact Us page. Blogspot Blogger platform offers a contact us form widget in the side bar but cannot be exported to a static Contact Us page.

Blogger Blogspot


Although there is a lot of information and guidance to overcome this problem on the internet about how to create a static Contact Us page on a blogger blog but a problem arises, the recommended method is not suitable for all devices especially it does not work on mobile devices.

Here is a suggested way to overcome the problem that the Contact Us page does not work with mobile devices. The method used is to use external webhosting to upload all the files regarding the Contact Us page and export it to the Contact Us page on Blogspot Blogger blog.

The first step, must be already have a contact us form template, or can download it for free without having to register or sign up. Available with a variety of contact us form template options.

Download Contact Us Form Template


Second step, choose webhost that offers free web hosting and has database facilities to upload .php files to create a static Contact Us page.

Sign up and create an account with 000webhost, just accept the subdomain offered and can start uploading all files related to Contact Us form, if need to create a database, do it first before uploading files.

The recommended tool for uploading web files to web server is Filezilla FTP Client. Using Filezilla FTP Client for beginners here

Sign Up With Free Webhosting


After all the processes in the first step and the second step above are completed, leave the result as in the picture. May be different with your template. A plain background and let it sit in the upper left corner. Run a test to make sure that contact us form is working properly.

Contact Us Page Up And Running


Last step, log in to the Blogger dashboard, select 'Pages' then select 'New Page', create a Contact Us page, then copy and paste the code below into the Contact Us page and click 'Update'.

Copy and paste this code:

  <object width="400" height="300" type="text/html" data=" your-file.php"></object>  


Replace "your-file.php" with the URL of contact us page created before.

Example URL: https://subdomain.domain.com/contact.php


Successfully added Contact Us page codes to Blogger blogspot, now the static Contact Us page is up and running, responsive and mobile device friendly.


How To:   Use FileZilla    Use IrfanView    Use Canva


Applying SEO For Better SERP

Applying SEO For Better SERP


SEO cannot be avoided in online business, SEO or Search Engine Optimization is one of the techniques to use in order to achieve more volume of traffic to your site. Without a good number of people visiting your web page, you won’t be able to expose your site to more people or potential customers. Thus, you need to recognize the importance of internet traffic, so that you would be able to take necessary steps in SEO and attain it.

SEO is closely related to keywords you are using that pull the most traffic. This will give you more edge over your competitors in terms of attracting more potential customers to your website. Once you identify the best keywords, optimize your site with it, as well as your articles, so that you can maximize the benefits you can derive from it.

SEO is more accurately said your website is crawl-able by various search engines and indexed web pages, in order for people to find your site when they search for information related to it, your web portal should be crawl-able by search engines. To achieve this, make sure that certain files you have on it does not block your site from being indexed.

Being indexed page will get free organic traffic from search engines, which is why it is best if you focus on attaining it for your web page. Organic traffic can be obtained if you are able to take the right steps in applying SEO. Aside from that, you can also achieve it if your site has good content. Thus, focus on this technique, since it can make your site gain more traffic through search engines.

Good SEO technique will results good SERP or Search Engine Results Page rankings which is always fluid. In other words, since search engines base the SERP to different and various factors, any change in such factors may also create a change on the page rankings. Therefore, you should also be flexible, you should try to use other sets of keywords from time to time, and add more content to your site.

It is very important to be patient in applying your SEO techniques. Keep in mind that it may take some time, before you could reap the benefits from it. Aside from that, SEO is something that you need to do continually, even if you have already attained your goals. Thus, it is a continuous process, as long as you want your site to be competitive.


The Power Of The Internet

The Power Of The Internet


Technology and the Internet have greatly changed the way the world works. In the past we could only get information from newspapers, books, journals and so on but now the situation is much different. The Internet allows access to a variety of knowledge without any geographical limitations or time barriers.

Whatever information is needed can be found through technology by pressing a button or mouse on a computer or smartphone, through technology and the Internet information in the form of visuals and videos can be obtained quickly and accurately.

The truth is that the Internet gives us all a level playing field, no matter where we are in the city or the countryside, as long as we have access to the internet. This is because all of us are able to use the Internet and the technology in our hands to advertise, get information and connect in business, online transactions have become the norm in almost all types of business. No matter what, the buying and selling and banking process can be done virtually easily and safely.

The existence of the Internet has connected the world, it allows us to entertain, generate business and offer benefits for everyone, allows shopping, exploring knowledge and even finding a partner, the Internet has its own advantages and obstacles. However, the benefits of the Internet far outweigh its drawbacks.

Big names were born and exist because of the internet such as Microsoft, Apple, Google, Yahoo which are well known by internet users and surfers all over the world.


Popular Posts